Frame it... | Page 2 | the Fashion Spot

Frame it...

These are from the author of Bloesom (who I love because she is not only chic, but lives in KL, Malaysia where I am from and spent most of my childhood) who is currently guest blogging on Design Sponge http://www.designspongeonline.com/category/guest-blog

img_q4_snowdenflood_1.jpg

The above design is by Leanne of Snowden Flood. And this is her own home
While not neccessary my style I like the way she uses not only different frames but different mats (or in some cases not at all) and different subject matter.
 
Just discovered this thread!
I'm actually re-decorating my appartement and this's so great and inspiring.
 
i like the idea of empty frames on the wall but i don't know if i would be able to pull it off in my own space...

maybe i could..

who knows :p

thanks for the new pics adorefaith :heart:
 
awesome thread :heart:

can i get any opinions on framing fabrics ??
i have some small 6" x 6" fabrics that i'll put up in a few galleries

usually i'd do it like this picture:
http://aycu16.webshots.com/image/33095/2000304590679265953_rs.jpg
it's the artwork behind mat board.. leaving out the extra (black) border around it as well as the glass
this works well for thin fabrics..

this time though, i have a few tweeds.. fairly thick fabric
and i don't want to use mat board anymore because it's so difficult to cut.. the exacto knife hurts my hands
i bought some foam core, which is much thicker... my instructor finds it cheap-looking though, but my other instructor is fine with it.

it's important they are not behind glass because i'd like visitors to the gallery to be able to touch the fabrics :blush:

any suggestions? ^_^
 
Last edited by a moderator:
gius – I clicked the link and viewed a series of framed works. I have some ideas to expand the use of 6” X 6” fabrics for arrangement in a gallery - - - but I am uncertain if you have a requirement to use an actual ‘frame’. I may not actually understand the requirements that you need to meet – but these were ideas that immediately hit me...

I would do one of the following two options –
- Option One –
stretch a ‘base’ or ‘background’ fabric over a wood frame sized to your specifications – arrange your fabrics in the desired pattern onto the base fabric [sew or glue into place] - - do NOT frame, as the eye will be drawn to your customized design - - ultimately this can be framed, if necessary

- Option Two -
choose a conventional oil canvas – sized to your specifications – spray with glue – place your ‘base’ or ‘background’ fabric onto the canvas, leaving enough extra fabric to ‘finish’ by folding and stapling very neatly on the back of the canvas – once the fabric and glue have dried, then you can arrange your 6” x 6” fabrics

- Please note -
If your work requires a ‘mat’ – or a ‘frame’ - - perhaps you can cut and paste these onto the edges of the canvas. – This option does not use glass or an actual frame, so it satisfies your desire to appreciate the textures of the fabrics...

I sincerely hope that I didn’t misunderstand your requirements! :flower:

Best regards. B)
 
Thank you for the help!! :heart: Those are pretty interesting ideas

It was for two gallery shows which unfortunately had started a few weeks ago and will already end this Sunday.
The thing about my fabrics is, the edges of each one are jagged :blush: (I had trouble weaving them straight), so I had to hide the edges. What I did was take mat board cut to 6 x 6 and then i placed the fabric on top, folding the edges under... behind the matboard. I stretched it from the back ---instead of stapling, like in your suggestion, I just sewed strings at one edge to the other edge, stretching it taut as I went along... This way, it didn't damage the fabric.
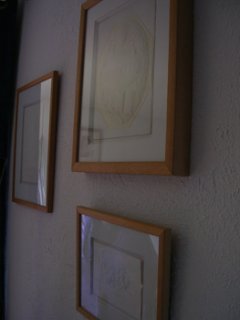
They all hang separately on the wall... It's kind of a series :) I haven't even visited my exhibitions yet...so I don't know how they hung them on the wall. I only tied string across the back of board so it would hang from a tack on the wall, but I'm not sure if it will lay flat on the wall like that...

The other series I had are prints, and the fabric is fairly light and fine and I just mounted it on mat board using mounting tape. Then I cut a square with a square inside (a frame) of mat board and put it on top, to cover the edges of the fabric... using more mounting tape. The nice mounting tape has styrofoam sandwiched between two tapes, so it gave a nice 3-dimensional quality

Now I realise mat board is not too difficult to cut
In fact I'd tried to cut it in one swipe in the beginning, so no wonder I almost gave myself arthritis :ninja: This time I went over the incision about 3x and the slice was nice

I'll post the last set of fabrics (my paper ones) after this Sunday. I sewed the fabrics on to stiff paper and taped it to foamcore, applying another layer of foamcore on top, for framing each fabric and yarn sample. This one was harder to cut cleanly... because of the styrofoam in the foamcore... a little messy... (Foam core is just two glossy papers sandwiching about half-a-cm of styrofoam)
 
gius -

Thank you for the follow-up explanation – we’re all counting on you to supply photos of your work! ;)

The fomecore – yes, I am quite familiar with this product and its use in framing. For readers who are not - - I found this lovely set of instructions on how to cut this product and achieve a very clean edge. All credit goes to The Herbert Hoover Presidential Library and Museum – where they use an abundance of this material for their presentations...

- - Extremely large panels of fomecore are best cut using a table saw [if you have one or know someone who has one...]

Smaller projects - -

cuttools.jpg


cut1.jpg


cut2.jpg


cut3.jpg


cut5.jpg


Hope this helps the effort to successfully work with this material. :flower:

Footnote – The Herbert Hoover Library and Museum also provided a very nice explanation of their tested ‘best products’ to use for attaching materials to fomecore. But I’ll cover that in a separate post.

Best regards. B)
 
Thanks for the instructions
Now I remember when I first learned how to frame, we did that too-- cutting on an angle, but we used a board that had the special blades and rules installed, so all we had to do was move the blade

I'll practice this today then ! :) with some scrap pieces
The messiest part was the 'inside square' of the foam core frame that I made... if that makes sense
The corners... :neutral:
 
The How – To’s of attaching materials to fomecore
[credit in this section belongs to The Herbert Hoover Library and Museum]

- Paper-to-fomecore and fomecore-to-fomecore
- - Double sided tape - - inexpensive – has the strength for paper-to-fomecore projects – usually stocked with regular adhesive tapes in most stores [aside from paper towels, this is my most purchased item in life – I love this stuff ] :p

- - fome tape - - rather expensive – can be purchased in large rolls [art supply stores, office supply, hardware stores] - - good point to know is that packages of small pre-cut pieces can be purchased for smaller ‘one-time’ needs to avoid the investment in a large roll. - - This is a ‘foamy’ tape that is strong enough, when used to hang posters on a wall, to take plaster along with it when one attempts to remove it. This adhesive is best used to attach fomecore-to-fomecore, but it will ‘show through’ from the reverse side of paper, which limits its use.

- - spray adhesive - - works well to attach paper-to-fomecore, but not strong enough to adhere fomecore-to-fomecore - - Has many limitations - requires a well ventilated workspace – fumes are strong and unpleasant - requires a steady hand to distribute the spray without creating a ‘puddle’ which will not dry properly...

- - white glue - - will work with paper-to-fomecore and with fomecore-to-fomecore, but tends to wrinkle paper. This is an inexpensive product to purchase, which makes it a ‘plus’...

- - cold mount - - very expensive – best used for paper-to-fomecore projects - - art supply shops stock “Scotch PMA” [PMA = Positionable Mounting Adhesive] – comes in rolls and is effectively a large roll of double-sided tape. This tape is applied to the fomecome and then rubbed to each surface [your paper and then the paper-to-fomecore] to remove bubbles/air pockets and achieve a smooth surface

- - velcro - - very good for fomecore-to-fomecore projects, but not suitable for paper-to-fomecore – it will show through the paper.

- Fabric to fomecore
- - best to tape fabric onto the back-side of the fomecore once fabric has been appropriately stretched [varies with weight of fabric] across front of fomecore.


Note: If you have the available storage space – save the scraps from your fomecore trimming – scraps can be cut-to-size and used as ‘spacers’ to separate the frame from the object being framed.

B)
 
this thread is so inspiring!
i have a few blank walls that i'd like to cover with various framed photographs!
 
So here's the fabric I put under foamcore as mentioned earlier...

It's fabric/yarn stitched to stiff paper and then I used double-sided tape to mount it to the back of the foamcore. Squares in the foamcore had been cut prior

Unfortunately I don't have my camera, so I just scanned it
So there is too much light and you can't see exactly what's going on. Anyway these lines appearing in this picture, they are folds (not cuts). So, I guess after time the foamcore paper folds on itself
framing1ts5.jpg

I don't really think I hung this work in the gallery like this. It would have probably been rejected :lol: So I'm guessing it appeared when I removed it and brought it home...
Anyway you can see the squares, on the inside the cutting is terribly irregular --I had a real issue with that

Here's another part of the work:
framing2qr0.jpg

Hopefully you can see them this time --they are cuts. When I made corners, I would cut a little bit ahead.. so that I could remove them easily. But it's very ugly :ninja: I am guessing if I cut it at the 45* angle, it would be fine? I don't know how I could cut at that angle though... Maybe a ruler with a 45* angle that I could rest the blade on while cutting...
 
gius -

Thank you for the follow-up explanation – we’re all counting on you to supply photos of your work! ;)

The fomecore – yes, I am quite familiar with this product and its use in framing. For readers who are not - - I found this lovely set of instructions on how to cut this product and achieve a very clean edge. All credit goes to The Herbert Hoover Presidential Library and Museum – where they use an abundance of this material for their presentations...

- - Extremely large panels of fomecore are best cut using a table saw [if you have one or know someone who has one...]

Smaller projects - -


Hope this helps the effort to successfully work with this material. :flower:

Footnote – The Herbert Hoover Library and Museum also provided a very nice explanation of their tested ‘best products’ to use for attaching materials to fomecore. But I’ll cover that in a separate post.

Best regards. B)

I've done framing in a museum ... and we don't use "utility knife" ... :blink: but a manual machine ...
but for DIY it's a good idea ...
think that the "product" (fomecore in english ??) doesn't have to be too thin or it wouldn't be really nice in the frame and around the picture ....
it's really easy to do honestly, after one ...

My parents got all their (good) photos framed by "artisans" ...
it's always beautiful ... My father offered once a picture to my mom of her dad (my grand dad) ... the picture is framed in a beautiful frame (:innocent:) but there's nothing like fomecore ... it's like in a gap ... i find it very good ...

and i have two Happy New Year's card framed from ... M. YSL .... :heart:
 
here they are ... not sure you can really see well ...
- photos by me -


Attachments

  • DSCN7865.jpg
    DSCN7865.jpg
    27.6 KB · Views: 4
  • DSCN7869.jpg
    DSCN7869.jpg
    22 KB · Views: 4
  • DSCN7870.jpg
    DSCN7870.jpg
    13.7 KB · Views: 4
  • DSCN7871.jpg
    DSCN7871.jpg
    17.8 KB · Views: 4

Users who are viewing this thread

New Posts

Forum Statistics

Threads
215,566
Messages
15,307,711
Members
89,588
Latest member
mrtyjurelle
Back
Top