You are using an out of date browser. It may not display this or other websites correctly.
You should upgrade or use an alternative browser.
You should upgrade or use an alternative browser.
DIY fashion ideas
- Thread starter Ceptuouse
- Start date

you need chain and lot of suede ribbons, seems easy

net-a-porter.com
Anonymous Agent necklace

http://www.etsy.com/shop.php?user_id=7001555
Rodarte diamante leggins

and park&cubes

style.com
park&cube
tutorial - http://www.parkandcube.com/?p=694#comments
net-a-porter.com
Anonymous Agent necklace
http://www.etsy.com/shop.php?user_id=7001555
Rodarte diamante leggins
and park&cubes
style.com
park&cube
tutorial - http://www.parkandcube.com/?p=694#comments
gius
Active Member
- Joined
- Jan 8, 2006
- Messages
- 10,855
- Reaction score
- 12
the rodarte top is also quite cool
http://i68.photobucket.com/albums/i33/Yoline00/rodarteleggins_stylecom.jpg
i wonder if the strips are stitched on to a foundation?
http://i68.photobucket.com/albums/i33/Yoline00/rodarteleggins_stylecom.jpg
i wonder if the strips are stitched on to a foundation?
some new ideas again
headpiece with chains
tutorial - http://www.luckymag.com/blogs/luckyrightnow/2009/05/guest-bloggers-the-bleachblack-1.html
necklace with fringes and zipper
tutorial - http://www.luckymag.com/blogs/luckyrightnow/2009/05/fringe-benefits.html
necklace

source Le Fashion
headpiece with chains
tutorial - http://www.luckymag.com/blogs/luckyrightnow/2009/05/guest-bloggers-the-bleachblack-1.html
necklace with fringes and zipper
tutorial - http://www.luckymag.com/blogs/luckyrightnow/2009/05/fringe-benefits.html
necklace
source Le Fashion

well this is just a really simple idea its nothing specific, but theres this paper you can get from office works, its called transformation paper and you can print whatever you want onto it using an ink printer then iron it onto a shirt or whatever-its not expensive. Its about 20 Australian Dollars for a Packet of 5 A4 Sheets of paper, its really easy and you can do anything with it.
daniellat
Fashion Designer
- Joined
- May 7, 2006
- Messages
- 3,008
- Reaction score
- 2
ive use it a lot of times but if you print it on a stretchy thing like a tshirt or the print is full rather than just the outlines it kinda breaks after wearing it, its really cool if you want to print like your name on a tshirt or something like that but if your graphic is big, the first time you wash it it will fall apart. but i guess there are better quality papers to work with, ive only used HP inkjet paper though
gius
Active Member
- Joined
- Jan 8, 2006
- Messages
- 10,855
- Reaction score
- 12
i used to research iron-on transfers ..
i was told by a guy who does these on t-shirts for a living..
you can use Epson Durabrite printers. they use durabrite inks.. made of waterproof pigment that doesn't crack/fade under 100+ washings. he says in the States, the printer version C88 costs $80 only
he says Avery papers are good if you want to make a few shirts. you can do transfers on both light and dark. but if you want to make a lot more t-shirts, say up to 15, he likes the company bestblanks.com. It's like $25 for a set of 25 sheets.. cheaper. And they don't peel or crack if you use it with the Epson Durabrite
hmm i might try out the Epson Durabite.
I've never actually had a problem with big images cracking, even after a wash. It happened once on a small image. It was on a streachy tight singlet though, and the image was on my chest so it cracked a little bit.
I guess it depends on the quality of the paper.
I've never actually had a problem with big images cracking, even after a wash. It happened once on a small image. It was on a streachy tight singlet though, and the image was on my chest so it cracked a little bit.
I guess it depends on the quality of the paper.

DIY with Malina Joseph
from Elle.com
http://www.elle.com/Fashion/Fashion...ina-Joseph-Re-create-runway-looks-on-ELLE.com
adding shoulderpads
from Elle.com
http://www.elle.com/Fashion/Fashion...ina-Joseph-Re-create-runway-looks-on-ELLE.com
adding shoulderpads
i found tutorial for wang fringed booties - http://www.outsapop.com/2009/05/fringe-your-heels-like-alexander.html


princessaud
Member
- Joined
- Jan 16, 2006
- Messages
- 150
- Reaction score
- 1
Anyone knows how to rip stockings/fishnets without destroying them? i've tried ripping my stockings but somehow they always end up looking totally crappy. TIA 
found from threadbanger.com:
Have any stockings that you ripped months back but haven’t had the heart to toss? Get out those scissors or a razor and vertically glide over a few spots gently (very gently) while making a couple holes in other areas. Focus on the upper thigh and down the knee. And when the trend is caput you can go back to the original diy idea, make a headband!
one new idea again

from shopbop.com
Have any stockings that you ripped months back but haven’t had the heart to toss? Get out those scissors or a razor and vertically glide over a few spots gently (very gently) while making a couple holes in other areas. Focus on the upper thigh and down the knee. And when the trend is caput you can go back to the original diy idea, make a headband!
one new idea again
from shopbop.com


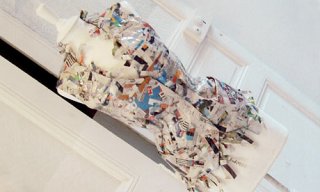
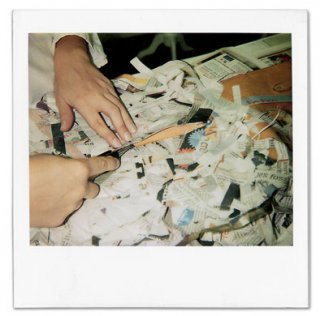
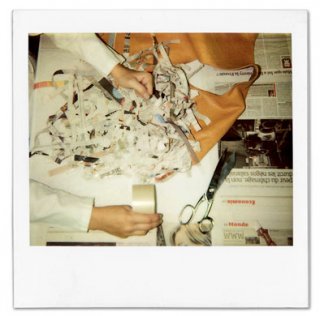
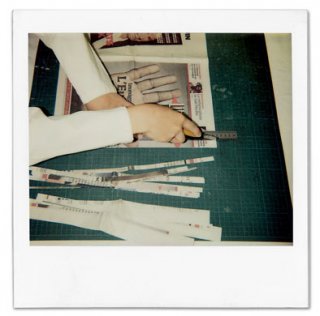
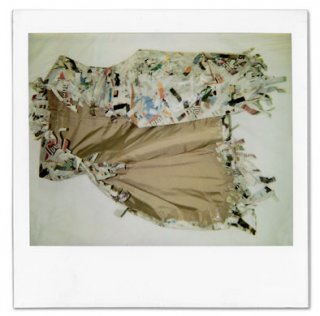
the guardian had a very good feature about making DIY paul smith shirts, maison martin margiela shirts and a temperley dress (source - guardian.co.uk)
here are the instructions for the margiela waistcoat.
Maison Martin Margiela says: This is a variation of a piece we did for the Artisanal 2009 collection. "Evaluate your skills and select materials that are easy to work with. Don't compromise your taste or you will look, and feel, like an idiot:
1. Take an old waistcoat or find one in a charity shop.
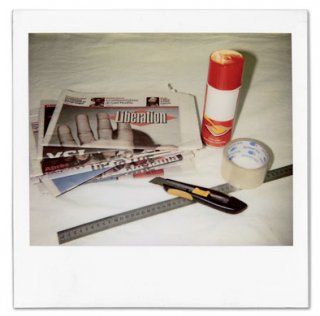
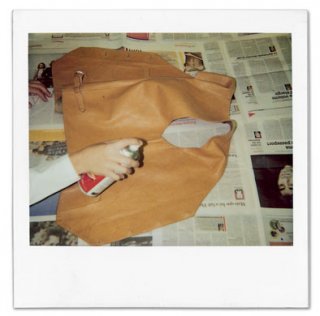
2. You will need a craft knife, spray-on adhesive, clear parcel tape, newspapers, a ruler (preferably metal) and a surface to cut on.
3. Lay the newspaper on a flat surface, as if you were about to read it, and cut it into strips around 1.5cm wide.
4. Spray the outside of the waistcoat with the adhesive spray.
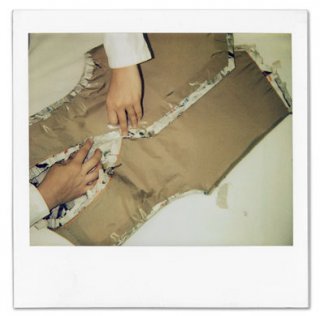
5. Stick the strips of paper to the waistcoat at different angles, pressing and folding as you go.
6. Using the tape, cover the whole waistcoat in a single layer of tape, tucking the ends of the paper strips and the tape neatly inside.
7. Tape more strips of newspaper onto the inside of the waistcoat, along the bottom and neckline, so that they hang down outside the waistcoat.
here are the instructions for the margiela waistcoat.
Maison Martin Margiela says: This is a variation of a piece we did for the Artisanal 2009 collection. "Evaluate your skills and select materials that are easy to work with. Don't compromise your taste or you will look, and feel, like an idiot:
1. Take an old waistcoat or find one in a charity shop.
2. You will need a craft knife, spray-on adhesive, clear parcel tape, newspapers, a ruler (preferably metal) and a surface to cut on.
3. Lay the newspaper on a flat surface, as if you were about to read it, and cut it into strips around 1.5cm wide.
4. Spray the outside of the waistcoat with the adhesive spray.
5. Stick the strips of paper to the waistcoat at different angles, pressing and folding as you go.
6. Using the tape, cover the whole waistcoat in a single layer of tape, tucking the ends of the paper strips and the tape neatly inside.
7. Tape more strips of newspaper onto the inside of the waistcoat, along the bottom and neckline, so that they hang down outside the waistcoat.
Attachments
continued...from the guardian
more pics (they match with the steps)
more pics (they match with the steps)
Attachments


Similar Threads
Users who are viewing this thread
Total: 1 (members: 0, guests: 1)